
Onstage Quick Start Guide
Welcome to the Quick Start Guide for Onstage, the software live keys rig for Windows PCs and Android mobile tablets. Learn how to install the app, configure setlists, stack sounds, and map your hardware MIDI keyboard.
Installation & Setup
Installation, system requirements, and first-launch setup.
What is Onstage?
Onstage is a standalone live keys rig for Windows and Android. Unlike Ableton or MainStage, it is not a general-purpose DAW but a dedicated live keys rig, purpose-built to stay lightweight and reliable on stage. It requires no third-party plugin hosting; you simply install the lightweight application, download the sound pack, and connect your USB/Bluetooth MIDI keyboard.
Not sure what gear or cables you need?
Use the Setup Builder: answer a few questions about your keyboard and device, and we'll list the exact setup and materials for you.
System Requirements & Compatibility
- Windows: Windows 10 or Windows 11 (x64), including native support for Windows on ARM devices (Surface Pro and other ARM PCs). Direct installation.
- Android: Android 10 or higher. Touch screen interface on phone or tablet.
- MIDI Keyboard: Compatible with standard USB MIDI keyboards and controllers, plus Bluetooth MIDI (BLE MIDI) controllers on Android.
Download for Windows
Windows 10 / 11 · x64 & ARM
Download for Android
Android 10+ · Phone / Tablet
Bypassing Security Warnings
Unsigned Direct DownloadOnstage installs directly without a store. Windows and Android may show standard security prompts during setup:
Windows 10 / 11
SmartScreen WarningAndroid 10+
Unknown Sources / Play ProtectFirst Launch & Sound Pack Prompt
On first launching Onstage, the application automatically opens the Download Packs page so you can install the Onstage Basics Pack. Once installed, you will immediately have access to core piano, pad, and synth sounds to begin building patches.
Setlists & Patches
Organize songs and manage multi-layer live rigs.
Finding Setlists and Patches in Onstage
From the Start Page → tap New Setlist or Open Setlist, or select any setlist under Recent Setlists.
Understanding Setlists vs. Patches
Think of a Setlist as your concert song order, and a Patch as the complete sound rig for a single song. When you tap a patch, all 16 sounds, splits, transpositions, and ambient pads switch instantly without cutting off held notes.
Setlists
A Setlist represents your live show or service order. It contains the ordered list of sound patches you will switch between during a performance.
- Create a setlist from the Start Page (New Setlist) or browse, search, rename, edit, import, and delete setlists from the Setlist Library (Open Setlist).
- The 2 most recent setlists appear under Recent Setlists on the Start Page for 1-tap recall.
- Demo mode supports 1 active setlist with up to 2 patches per setlist. A License Key unlocks unlimited setlists and patches.
Patch Architecture
Each patch is an isolated multi-layer keyboard rig containing sound layers, scene volume snapshots, transpose settings, and per-patch Ambient Pad settings.
Play-In vs. Hear-In Transposition
Onstage supports semitone transposition configured per patch. Set your Play-In key (the physical key you play on the keyboard) and Hear-In key (the key the rig sounds in). Transposition transitions instantly and smoothly without any stuck notes or cutting off your sound.
Importing Setlists & Patches
Bring shared setlists and individual patches from other devices into your library.
Finding Import in Onstage
Setlists are imported from the Start Page →
Open Setlist → Import. Patches are
imported while a setlist is already open: tap Add
→ From Library → Import, then select a .onpatch file.
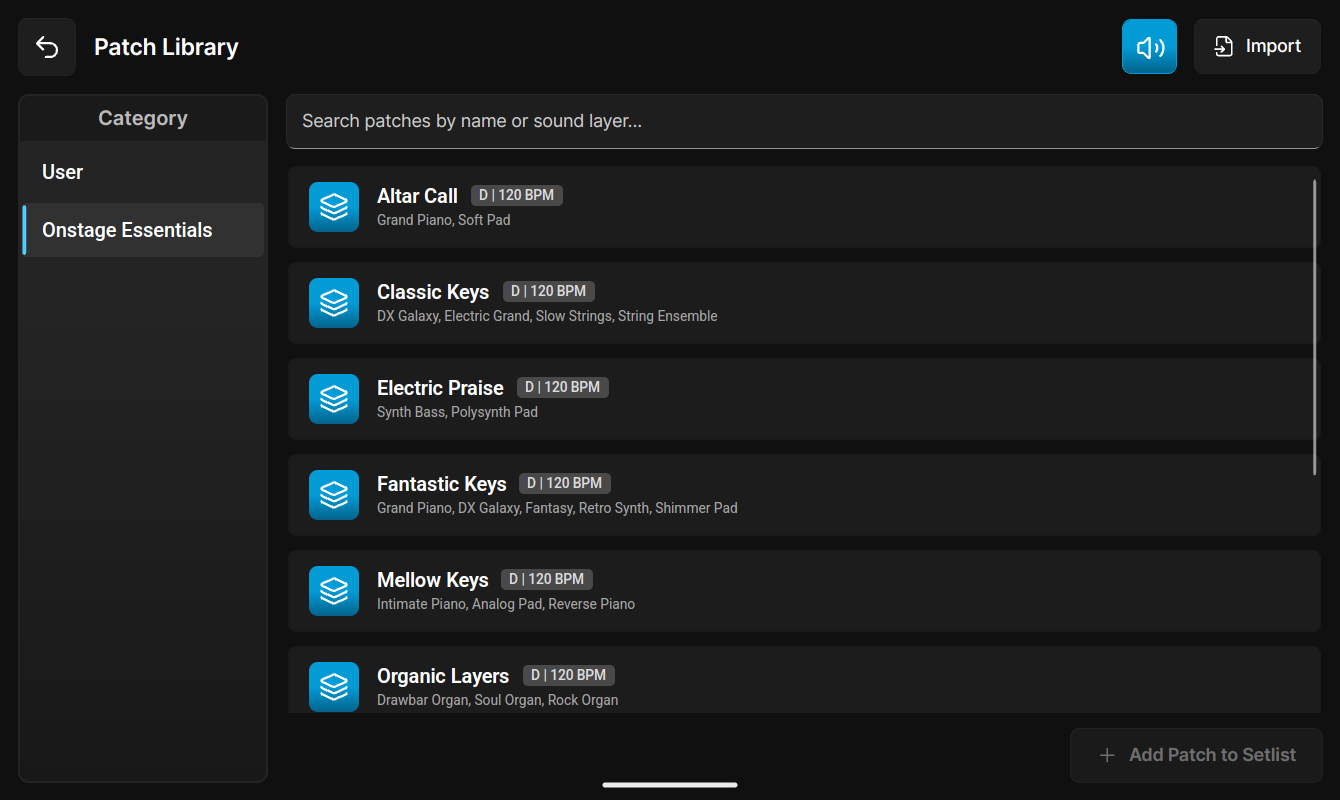
Onstage lets you bring in setlists and patches created or exported from another device (for example, a patch shared by a teammate). Importing a setlist restores it together with the patches it contains, while importing a patch adds a single patch to the setlist you currently have open.
Importing a Setlist
- From the Start Page, tap Open Setlist to open the Setlist Library.
- Tap Import.
- Select the setlist file you want to bring in. The imported setlist (and its patches) appears in your library, ready to open like any other setlist.
Importing a Patch
- Open the setlist you want to add the patch to.
- Tap Add, then choose From Library.
- Tap Import and select the
.onpatchfile. - The patch is added to your current setlist and can be edited or reordered like any other patch.
Sharing Setlists & Patches
To move content between devices, export a setlist or patch from the source device and import it on the destination.
⚠️ Sounds & SoundFonts Are Not Included: Shared setlists and
.onpatch files do not include any user SoundFonts (.sf2) or sound samples.
The person importing must already have the required content pack and sounds installed in
Onstage or the patches will not sound as intended. To share everything together (setlist,
patches, and the sounds they use), use the Pack Creator to export a
Content Pack (.onpack) instead.
ℹ️ Activation Requirement: Importing and exporting setlists and patches is a full-version feature. If the app is running in Demo Mode, tapping Import will open the License Activation prompt.
Sound Layer Editing
Stack up to 16 sound layers with splits, velocity, and expression.
What is a Sound Layer?
A Sound Layer is an individual instrument (such as an Acoustic Piano, Warm Pad, Organ, or Brass synth). By stacking multiple layers together, you can create massive blended textures or divide your keyboard into split zones (e.g., bass on the left hand, piano/pad on the right hand).
Every patch can stack up to 16 sound layers simultaneously (3 in Demo mode). Each layer features an extensive sound editor split into four categories:
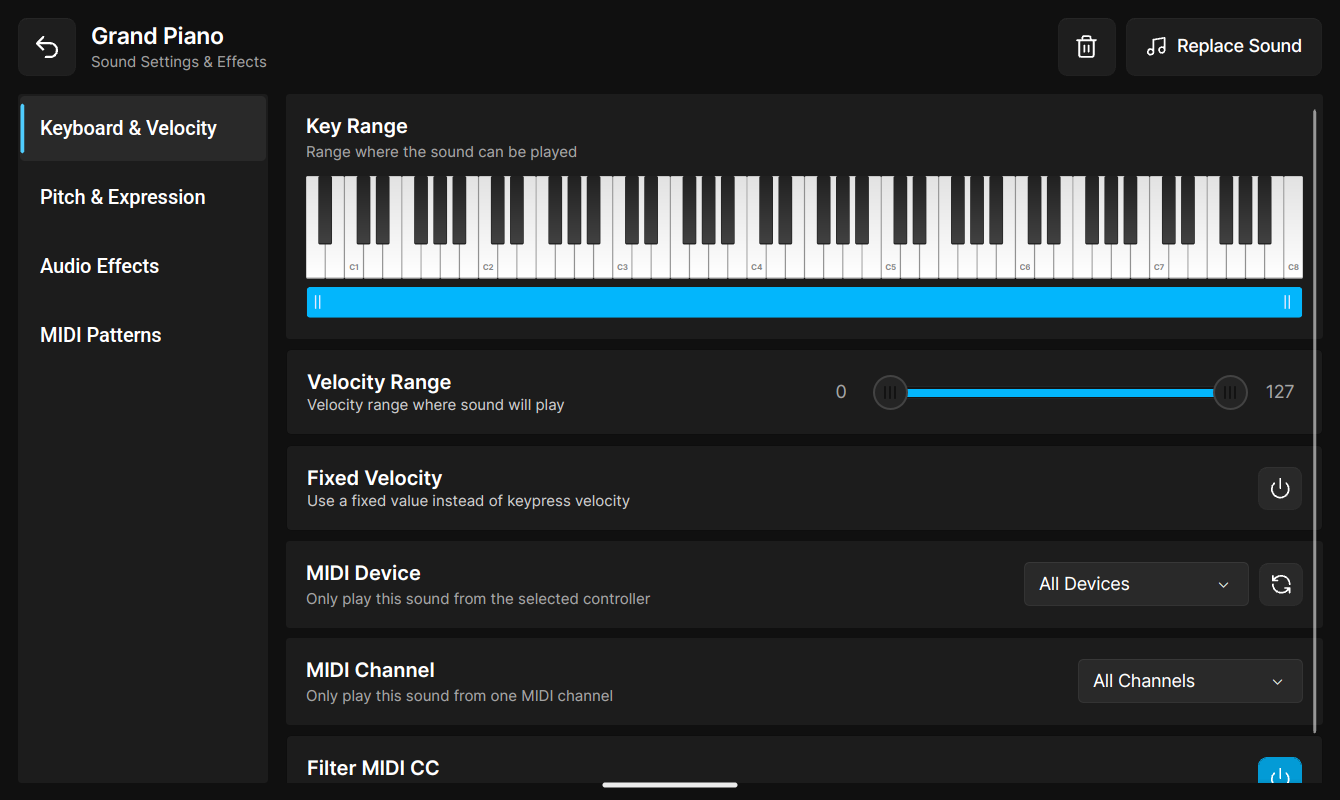
1. Keyboard & Velocity
- Key Range: Range sliders (21–108)
- Velocity Range: Circular min/max sliders
- Fixed Velocity: Fixed velocity toggle
- MIDI Device & Channel: Isolation filters
- Filter MIDI CC: Only allow essential controllers (mod wheel & sustain)
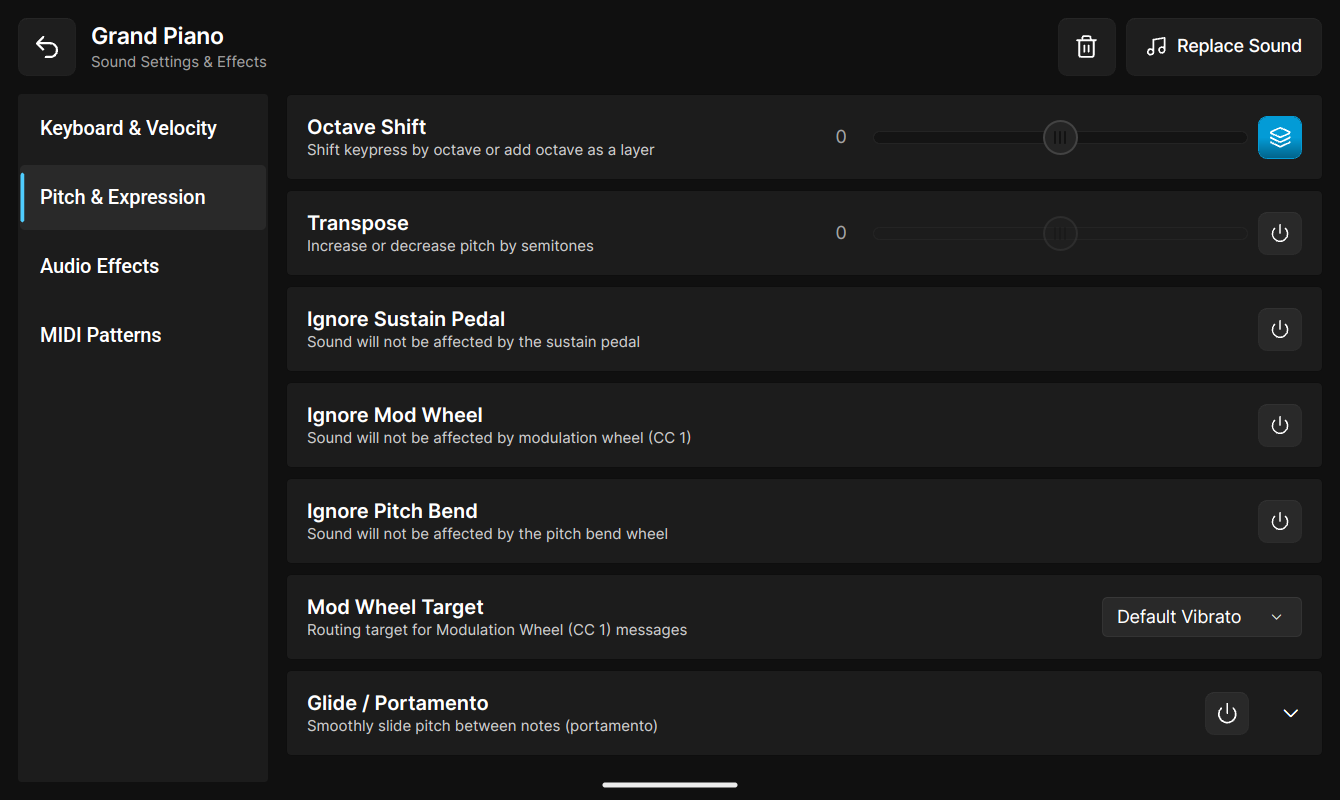
2. Pitch & Expression
- Octave Shift & Transpose: Octave shift (-3 to +3), octave layer, & semitone transpose (-12 to +12)
- Ignore CC: Ignore Sustain, Mod Wheel, Pitch Bend
- Mod Wheel Target: Default Vibrato, LowPass Sweep, Volume Swell
- Glide / Portamento: Always, Legato, Staccato modes & Time, Time Mode, Retrigger
3. Audio Effects
PRO- Gain: Per-layer output gain
- 3-Band Equalizer: Low & High shelving, Mid (gain, freq, Q)
- ADSR Envelope: Attack, Decay, Sustain, Release
- Reverb: Room presets, Size, Damp, Width, Level
- Chorus: Presets, Voices, Speed, Depth
- Stereo Delay: Echo, Ping-Pong, Slapback, Ambient Dub
4. MIDI Patterns
PRO- Chord Trigger: Bind a root note to multi-note chord grids
- Arpeggiator: Pattern, Subdivision, Steps & velocity grid
- Step Sequencer: Up to 16 steps with note & gate/rest
- Direct Keypress Sync: Runs from keypress timestamps
 Keyboard & Velocity
Settings UI
Keyboard & Velocity
Settings UI
 Pitch & Expression
Settings UI
Pitch & Expression
Settings UI
Basic Sound Design Workflow
Configuring Key Range & Splits
Under Keyboard & Velocity → adjust the Key Range slider on the piano roll interface to set split zones (e.g. Bass on C1–B2, Piano on C3–C6). Toggle Fixed Velocity for organ layers that don't use key dynamics.
Pitch, Expression & Mod Wheel Target
Under Pitch & Expression → toggle Ignore Sustain Pedal to prevent bass notes from sustaining. Set Mod Wheel Target to LowPass Sweep or Volume Swell for real-time filter sweeps using your hardware modulation wheel (CC 1).
Dynamic Scenes
Volume snapshots for song sections with smooth crossfades.
Why Use Scenes?
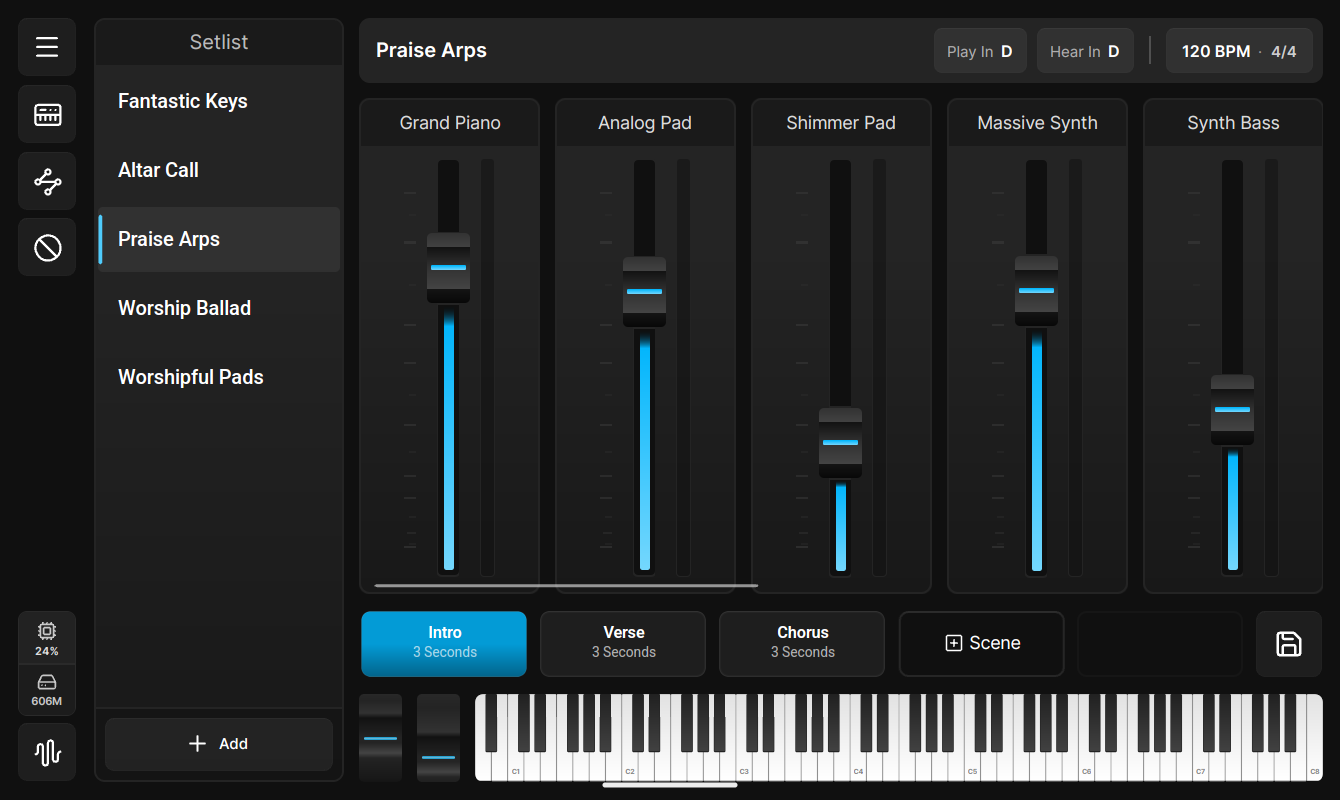
In live music, different sections of a song require different dynamics (e.g., quiet piano in Verse 1, huge piano + pad stack in the Chorus). Scenes let you switch layer volume levels instantly or over a smooth crossfade without changing patches.
Scenes capture layer-volume snapshots per patch (e.g. Intro, Verse, Chorus, Bridge). Switching scenes crossfades every layer's volume smoothly over a configurable transition duration (seconds).
- Create up to 5 scenes per patch (3 in Demo mode).
- Set individual crossfade durations (e.g., 2.0s for smooth pad sweeps, 0s for instant changes).
- Capture the current layer volumes into the active scene using the Save button in the scene switcher.
- Trigger scenes using touch targets, footswitches, or MIDI-learned buttons.
Ambient Pad Player
Instant one-key worship and ambient pad engine.
Finding Ambient Pad Player in Onstage
Open any setlist patch → look at the bottom of the left sidebar → tap the AudioWaveform icon (looks like vertical audio wave lines) to open the Ambient Pad Player page.
What is the Ambient Pad Player?
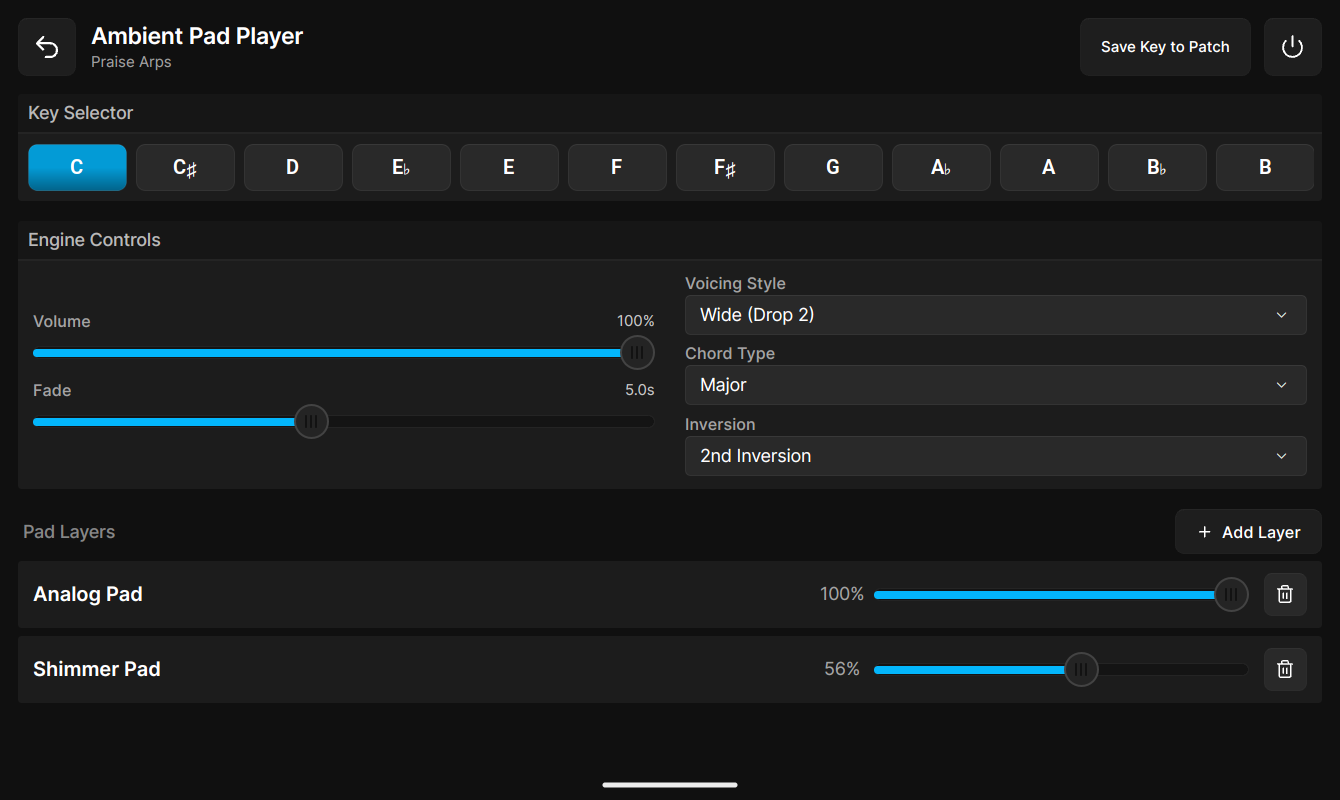
The Pad Player produces continuous ambient background drone pads in any key (C, D, G...). It operates independently of your keyboard layers, allowing you to fill empty space during song transitions, speak over pads, or play ambient worship without taking up key zones.
The built-in Ambient Pad Player provides instant background pads and drone chords during setlists without occupying keyboard split zones.
- Key Selector: Tap a chromatic root key (C, C#, D ... B) to crossfade the pad engine to the selected key.
- Engine Controls: Adjust Master Volume and Fade (transition time), plus Voicing Style, Chord Type, Inversion, and Mod Wheel routing.
- Chord Types & Voicings: Major, Minor, Sus2, Sus4, Maj7, Min7, or Dom7 with Standard, Wide (Drop 2), Deep (Sub Bass), or High Octave voicings and inversions.
- Mod Wheel Routing: Route CC1 (Modulation Wheel) to a Lowpass filter sweep for real-time pad brightness control.
- Pad Layers: Stack multiple pad sounds with individual volumes (1 layer in Demo mode).
- Save Key to Patch: Store the active key, chord, and voicing settings per patch so changing patches recalls the pad engine automatically.
MIDI Learn & Fader Pickup
Hardware controller knob, fader, and button mapping.
Finding MIDI Devices Setup in Onstage
Tap the KeyboardMusic icon (looks like a musical keyboard with notes) in the top-right corner of the Start Page, or in the left sidebar of any open setlist (directly above the MIDI Learn icon). All connected controllers are enabled by default. Assign each one a Routing Role (keys, control surface, or disabled) so knobs and faders never trigger synth notes. On Android, Bluetooth MIDI (BLE MIDI) controllers are supported and appear here too.
Finding MIDI Learn in Onstage
Open any setlist patch → look at the left sidebar → tap the Waypoints icon (four connected dots directly below the MIDI Devices KeyboardMusic icon).
Understanding MIDI Learn & Smart Fader Pickup
MIDI Learn lets you tap any control on screen and move a physical knob or slider on your keyboard to link them together. Smart Fader Pickup prevents sudden volume jumps when switching songs: your physical fader will not alter volume until it passes through the current saved setting.
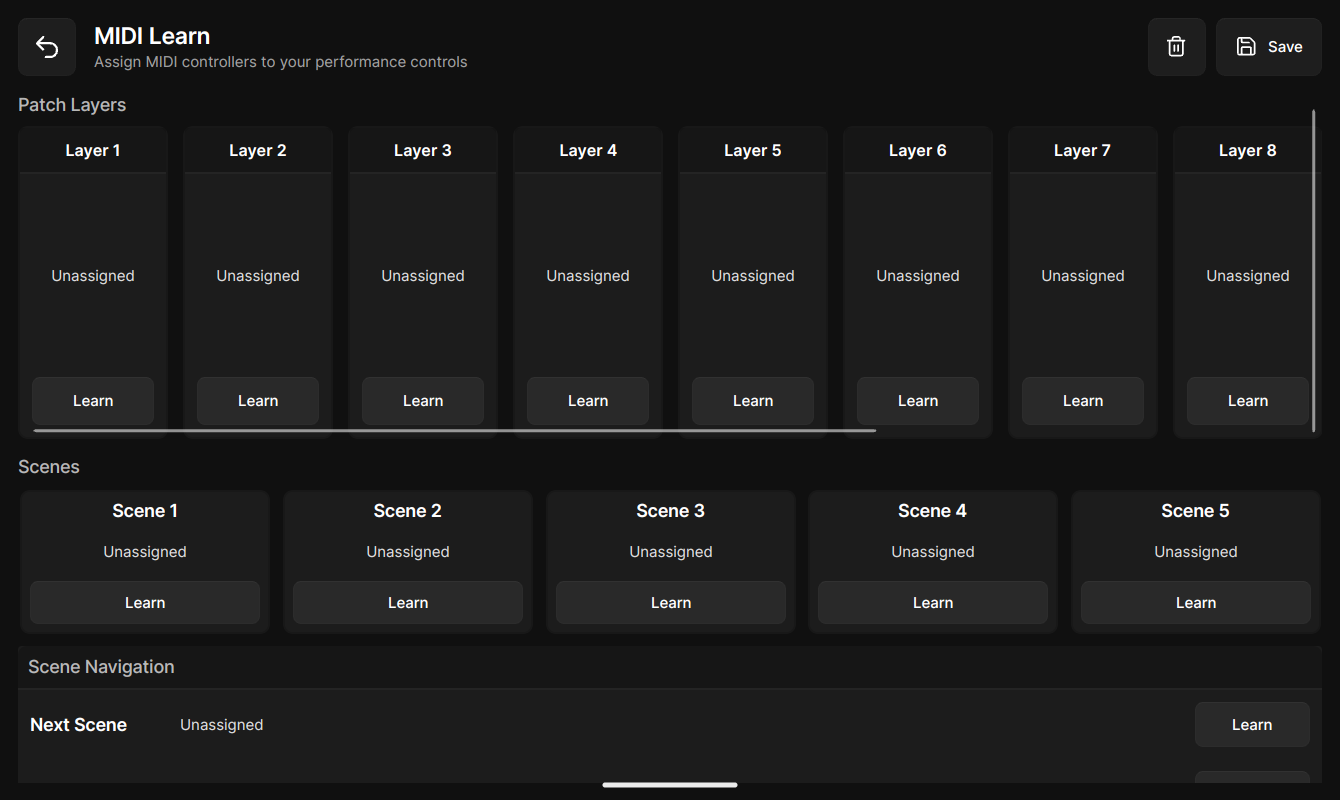
Bind any hardware MIDI controller knob, fader, pad, or footswitch directly to Onstage performance controls. The MIDI Learn page groups the supported learnable targets into the following sections:
Patch Layers
16 volume slots (Layer 1–16) for controlling the volume of each sound layer in the active patch.
Scenes
5 scene trigger slots (Scene 1–5) to fire scenes directly from a pad or footswitch.
Scene Navigation
Next Scene and Previous Scene for stepping through scenes in order.
Patch Switcher
Next Patch and Previous Patch for moving up and down the setlist without touching the screen.
Master Volume
A single Master Volume slot controlling the overall output level.
Pad Player
Pad Volume and Pad On/Off for the Ambient Pad Player engine.
Tempo Controls
Tap Tempo, Increase, and Decrease for live tempo control of arpeggiators and sequencers.
- Device & Channel Aware: Bindings lock to specific controller names so plugging in multiple devices works seamlessly.
- Smart Fader Pickup: Prevents volume jumps when changing scenes or patches. The physical fader movement is ignored until it passes through the current volume level.
- Learnable Inputs: The Learn button responds to CC knobs/faders, the mod wheel (CC 1), the sustain pedal (CC 64), and note-on pads or buttons.
Studio Audio Effects Suite
Studio quality per-layer audio processing (License Key feature).
What is the Studio Audio Effects Suite?
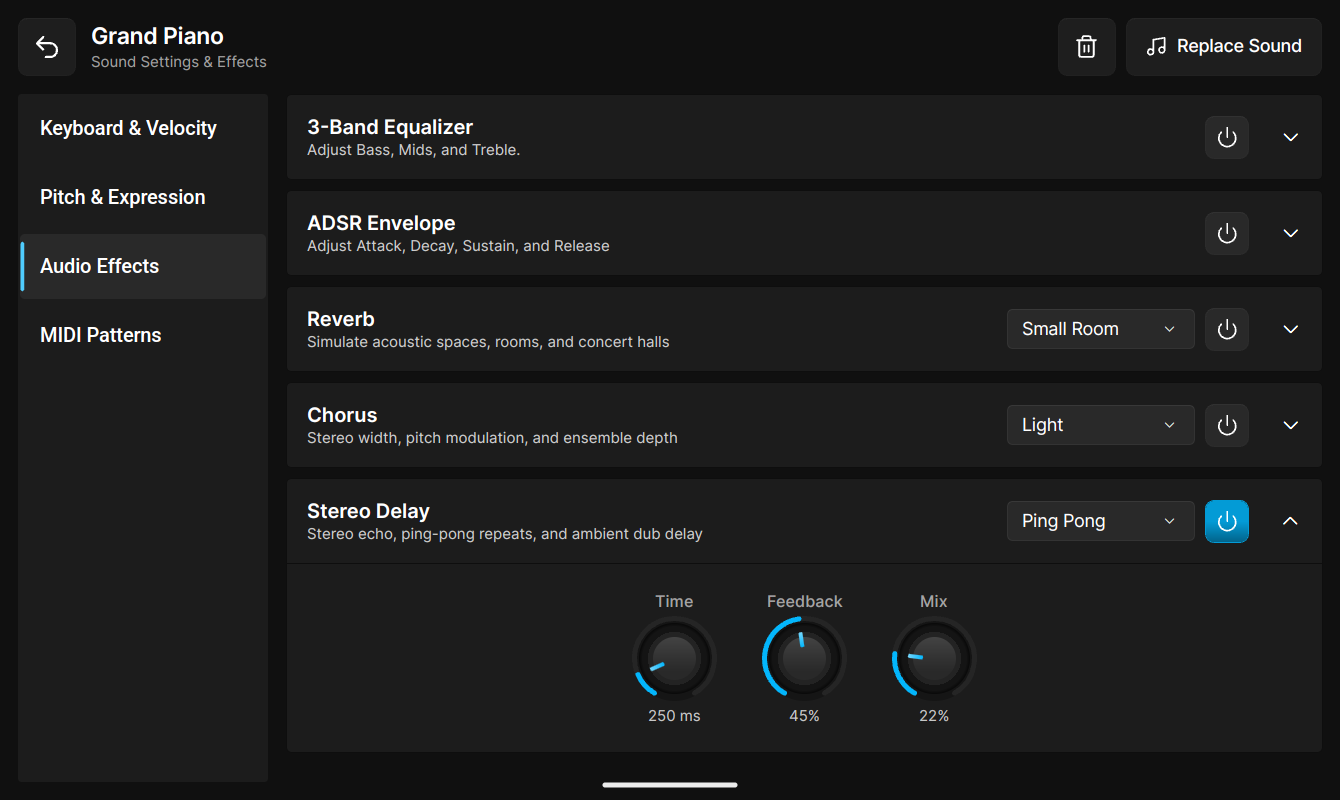
Studio audio effects allow you to polish raw instrument sounds directly inside Onstage. Use EQ to shape warmth or brightness, Reverb to create room space, Delay for rhythmic echoes, and Chorus for stereo width without requiring external hardware effect units.
Gain
Per-layer output gain for balancing stacked sounds.
3-Band Equalizer
Low shelf, parametric mid (gain, frequency, Q), and high shelf per layer.
ADSR Envelope
Attack, Decay, Sustain, and Release shaping per layer.
Reverb
Small Room, Medium Hall, Large Hall, and Cathedral presets with Room Size, Damp, Width, and Level.
Chorus
Light, Medium, Heavy, and Flanger presets with Voices, Level, Speed, and Depth.
Stereo Delay
Echo, Ping-Pong, Slapback, and Ambient Dub presets with Time, Feedback, and Mix controls.
MIDI Patterns
Rhythmic arpeggiators, chord triggers, and step sequencers.
What are MIDI Patterns?
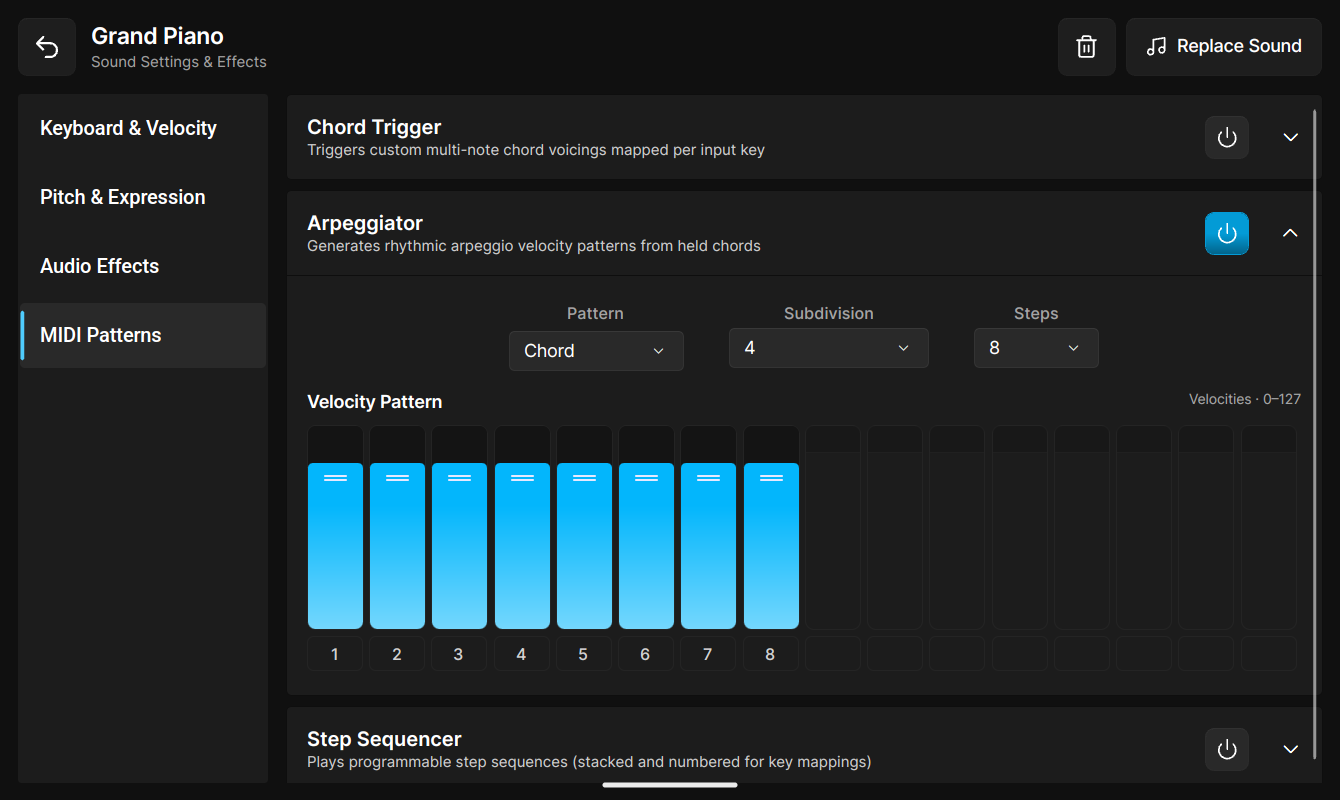
MIDI Patterns alter your note input in real time. Arpeggiators turn held keys into rhythmic note sequences, Chord Triggers let a single key press fire complex multi-note chords, and Step Sequencers play custom rhythmic patterns.
- Arpeggiator: Pattern presets (Up, Down, Up / Down, Random, Chord), Subdivision, Steps, and 16-step Velocity Pattern grid.
- Chord Triggers: Map Root Note to custom multi-note chord grids with clear/learn note capabilities.
- Step Sequencer: Program sequence patterns up to 16 steps with note, velocity, and gate/rest tracking.
- Direct Keypress Sync: Runs directly from keypress timestamps without needing DAW clock sync.
Advanced Sound Design & Pattern Building
Arpeggiator & Velocity Pattern
Under MIDI Patterns → enable Arpeggiator. Select Pattern (Up, Down, Up / Down, Random, Chord), set Subdivision & Steps, and adjust the 16-step Velocity Pattern grid for rhythmic accents.
Chord Triggers & Root Notes
Under Chord Triggers → bind a single Root Note key to trigger a full chord grid of learned notes. Use right-click or long-press context flyout to Clear Root Note or Clear Note anytime.
Glide / Portamento Setup
Under Pitch & Expression → enable Glide / Portamento. Configure Glide Mode (Always, Legato, Staccato), adjust the Time Dial, and set Time Mode (Linear, Standard, Auto) for synth lead slides.
Audio Optimization, Latency & Crackle Fixing
Tuning audio drivers, buffer sizes, sample rates, periods, and exclusive access for low-latency, glitch-free audio on any device.
Finding Audio Controls in Onstage
Open Settings (Gear icon, top-right of the Start Page) → the Global Settings page groups controls under Audio Engine & Output (including the audio driver), Synthesizer & Voice Performance, Dynamics & MIDI, and Diagnostics & System Logs.
What is the Studio Driver?
The Onstage Studio Driver is Onstage's direct USB-audio driver for Android. It lets Onstage communicate directly with compatible USB Audio Class (UAC) devices, such as audio interfaces, USB-C hubs with a headphone jack, and keyboards with built-in audio, instead of relying on the standard Android audio path.
Why is it recommended?
Direct output usually gives live players lower, more predictable latency and more stable audio when using wired USB hardware. It can also avoid the resampling and extra buffering used by the Android system audio path.
When should I use the fallback?
The Studio Driver is still being improved for compatibility. If your device does not initialize, produces crackles, or loses output, switch to the standard Android driver, reconnect the device, or increase the buffer size. Windows uses Exclusive Audio Access (WASAPI) rather than the Studio Driver.
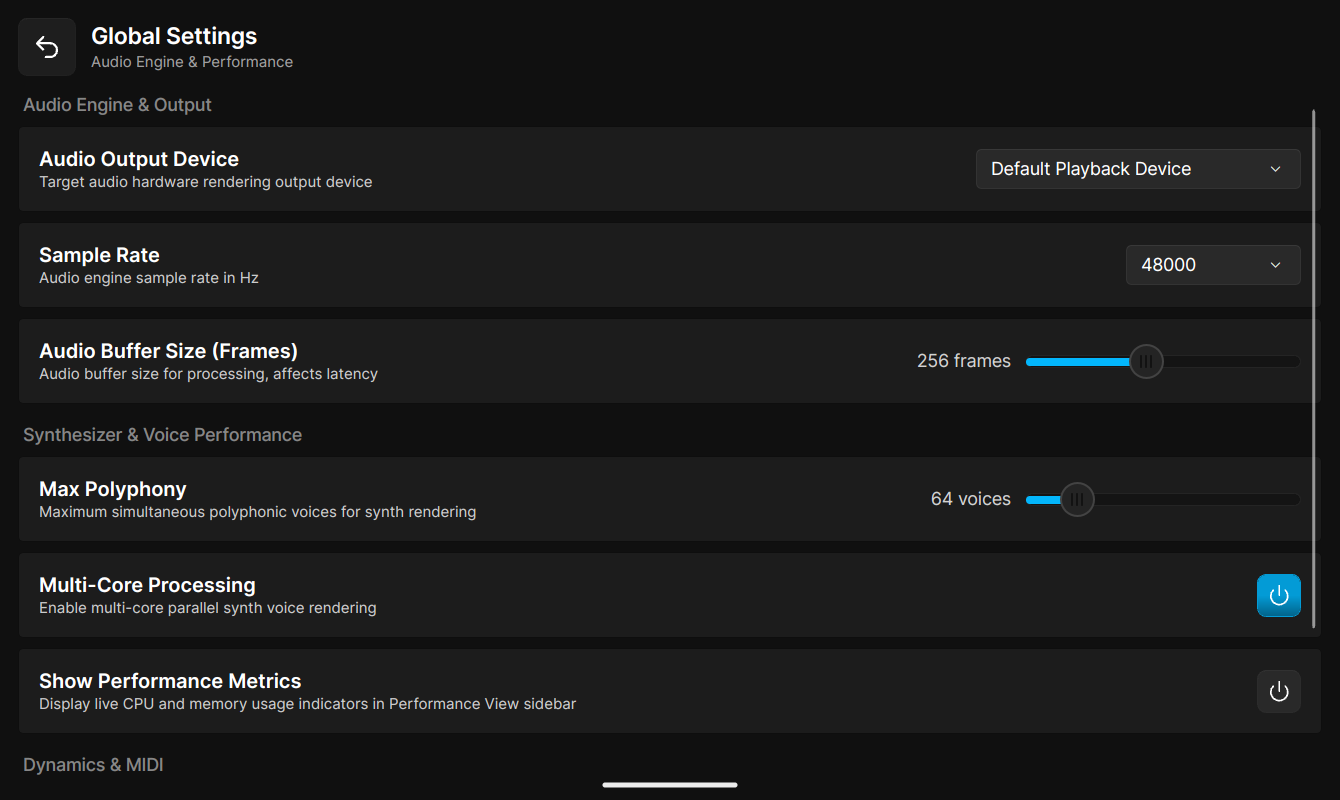
Audio Engine Controls & What They Do
Audio Output Device
Selects the target audio hardware Onstage renders to. Pick your dedicated interface or built-in output from the dropdown list.
Audio Driver / Studio Driver
On Android, the Studio Driver is Onstage's direct USB-audio path for compatible UAC interfaces, USB hubs, and keyboards with built-in audio. It is designed for low latency and stable output. If a device cannot initialize with the Studio Driver, switch to the Android driver/fallback path and increase the buffer size if needed. Windows uses Exclusive Audio Access (WASAPI) instead.
Sample Rate
Auto (Native) matches your device's rate for lowest latency with no resampling. You can also force 22050, 44100, 48000, 96000, or 192000 Hz.
Audio Buffer Size (Frames)
Controls response time (128, 144, 192, 256, 372, 512, 768, 1024). Smaller buffers (e.g., 128) give lower latency; larger buffers (e.g., 512) eliminate pops on lighter processors.
Audio Periods
Controls buffer cycle count (1–4). 1–2 periods provides lowest latency. Increase to 3–4 periods if your hardware suffers dropouts.
Exclusive Audio Access
Gives Onstage exclusive control over your Windows audio hardware, bypassing background system sounds for the fastest key response.
💡 No ASIO Drivers Needed: Thanks to Exclusive Audio Access, you don't need external ASIO drivers (like ASIO4ALL) on Windows for low latency.
Low Latency Mode
Uses the low-latency audio performance profile (WASAPI / AAudio MMAP). Disable it on devices that are prone to crackles or underruns.
Load Samples on Demand
Loads sound samples on demand as they are played instead of holding every layer's samples in memory at once. Lowering RAM usage on devices with limited memory and reducing load times for large patches or large SoundFont libraries.
Max Polyphony
Limits the maximum simultaneous voices (32–256) including release tails to prevent crackles during heavy chords.
Multi-Core & Show Performance Metrics
Multi-Core Processing shares the synth voice workload across processor cores. Show Performance Metrics displays live CPU & RAM usage in the Performance View sidebar.
MIDI Velocity Curve
Applies a global velocity scaling profile to match your keyboard's touch response.
Invert Sustain Pedal & Diagnostics
Invert Sustain Pedal flips CC 64 polarity for inverted pedals. Export Application Logs (under Diagnostics & System Logs) saves a text file for troubleshooting.
Recommended Setup Presets by Device
High Performance
- Buffer Size: 128–256 frames
- Audio Periods: 1–2 periods
- Sample Rate: Auto (Native) / 48000 Hz
- Exclusive Mode: ON (WASAPI)
- Low Latency Mode: ON
- Load Samples on Demand: ON
- Multi-Core: ON
- Max Polyphony: 128–256 voices
Balanced Setup
- Buffer Size: 256–372 frames
- Audio Periods: 2 periods
- Sample Rate: Auto (Native) / 44100–48000 Hz
- Exclusive Mode: ON (WASAPI)
- Low Latency Mode: ON
- Load Samples on Demand: OFF
- Multi-Core: ON
- Max Polyphony: 96–128 voices
Maximum Stability
- Buffer Size: 512–1024 frames
- Audio Periods: 3–4 periods
- Sample Rate: Auto (Native) / 44100 Hz
- Exclusive Mode: ON (WASAPI)
- Low Latency Mode: OFF if crackles
- Load Samples on Demand: ON
- Multi-Core: ON
- Max Polyphony: 32–64 voices
High Performance
- Buffer Size: 192–256 frames
- Audio Periods: 1–2 periods
- Sample Rate: Auto (Native) / 48000 Hz
- Audio Driver: Studio Driver for compatible USB audio
- Low Latency Mode: ON
- MIDI Driver: Default / Custom
- Load Samples on Demand: ON
- Multi-Core: ON
- Max Polyphony: 96–128 voices
Balanced Setup
- Buffer Size: 512 frames (Android default)
- Audio Periods: 2 periods
- Sample Rate: Auto (Native) / 48000 Hz
- Audio Driver: Studio Driver or Android driver fallback
- Low Latency Mode: ON
- MIDI Driver: Default Driver
- Load Samples on Demand: ON
- Multi-Core: ON
- Max Polyphony: 64–96 voices
Maximum Stability
- Buffer Size: 768–1024 frames
- Audio Periods: 3–4 periods
- Sample Rate: Auto (Native) / 44100 Hz
- Audio Driver: Android driver fallback if Studio Driver crackles
- Low Latency Mode: OFF if crackles
- MIDI Driver: Default Driver
- Load Samples on Demand: ON
- Multi-Core: ON
- Max Polyphony: 32–48 voices
Quick Troubleshooting Guide
Try steps one by one until resolved (you do not need to apply all steps).
Audio Crackling & Pops
- Increase Buffer Size (256 → 372/512)
- Increase Audio Periods to 3
- Confirm Multi-Core is ON
- Lower Max Polyphony if needed
- Disable Low Latency Mode if crackles persist
- Disable Load Samples on Demand if crackles persist
Latency & Key Delay
- Turn Exclusive Access ON (Windows)
- Confirm Low Latency Mode is ON
- Lower Buffer Size (e.g. 256 → 128)
- Lower Audio Periods to 1–2
- Disable Load Samples on Demand if first-note latency is an issue
Performance Monitoring
- Enable Show Performance Metrics
- Monitor live CPU & RAM load
- Bypass heavy layer DSP effects
- Toggle Load Samples on Demand to adjust RAM usage
Content Packs & Pack Creator
Downloading official sound packs, finding included presets, and building custom content packs.
Finding Content Packs in Onstage
From the Start Page → tap the Content Packs button (Package icon) to open the Content Library, or tap Pack Creator (PackagePlus icon, visible only in the full version) to export custom packages.
What are Content Packs?
Content Packs (.onpack) are self-contained bundles of
sound samples, SoundFonts (.sf2), and preset setlist patches. Onstage includes built-in
tools for downloading official sound packs as well as creating your own custom packs to
share with team members.
Where to Find Packs & Included Presets in Onstage
1. Downloading Official Packs
On the Start Page tap Content Packs to open the Content Library, then tap Download (also offered automatically on first launch and after license key activation). Download Onstage Basics (Free/Demo starter sounds) or Onstage Essentials (Full license pack with 33 sounds & 10 curated preset patches).
2. Finding Presets & Installed Sounds
Sounds can be found in the Sound Library when adding a new sound layer or changing a layer's sound in a patch. Preset patches can be found when adding a new patch to a setlist tap Add, then select from Library.
Creating & Exporting Custom Content Packs
Onstage includes a built-in Pack Creator UI allowing musicians and
worship leaders to package custom setlists, sound layers, and SoundFont (.sf2) samples
into portable .onpack files.
Step 1: Open Pack Creator
From the Start Page tap Pack Creator (PackagePlus icon, visible in the full version). Tap Choose to pick the setlist you want to export.
Step 2: Set Pack Metadata
Under Pack Details: enter Pack Name and Author (the Pack Identifier is generated automatically), and toggle Requires Full Version if the pack uses full-version sounds or DSP effects.
Step 3: Review & Export
Under Sounds: verify included sound layers and sample files.
Click Export Pack to generate a portable .onpack
file.
SoundFont (.sf2) Import Guide
Optimizing and importing custom SoundFont files for live performance.
Finding SoundFont Import in Onstage
Open any setlist patch → tap Add Sound or Replace Sound on any layer to open the Sound Library page → look in the top right corner → tap the Import Sound button.
Onstage allows you to import custom SoundFont (.sf2) files directly into your Sound Library. The Sound Library page opens automatically whenever you add a new sound or replace an existing sound layer inside a patch.
ℹ️ Activation Requirement: Importing custom SoundFonts is a premium feature. If the app is currently running in Demo Mode, attempting to click the Import Sound button will open the License Activation prompt.
Single-Preset Requirement & Polyphone Guide
For optimal memory usage and low audio latency on stage, Onstage requires
single-preset SoundFont (.sf2) files. If you have multi-preset
SoundFont banks, open them in free tools like Polyphone, right-click the desired preset, export it as
a single .sf2 file, and import it into Onstage.
💡 Need Help Converting? If you have multi-preset SoundFont banks and need assistance converting them for Onstage, feel free to reach out to us and we will help optimize your sound files for live performance.
Licensing & License Key Activation
Unlocking features and transferring keys between devices.
Finding Licensing Options in Onstage
From the Start Page → tap the Full Version button (if in Demo mode) or tap the About Onstage button at the bottom of the screen.
Demo Mode vs. License Key Activation
There is only one Onstage app: Demo Mode and the Full Version are the same download, so installing it is always the first step. Onstage opens as a free, fully functional Demo Version with no expiration date (includes the Onstage Basics sound pack). Purchasing a License Key does not give you a separate app; entering the key activates the app you already installed and unlocks unlimited setlists and patches, 16 layer stacking, DSP effects, MIDI Patterns, and the Onstage Essentials pack with 33 sounds & 10 curated preset patches.
| Feature Limit | Demo / Free Tier | Full License Key |
|---|---|---|
| Maximum Setlists | 1 active setlist | Unlimited |
| Maximum Patches per Setlist | 2 patches | Unlimited |
| Sound Layers per Patch | Up to 3 layers | Up to 16 layers |
| Scenes per Patch | Up to 3 scenes | Up to 5 scenes |
| Custom SoundFont (.sf2) Import | Locked | Full Access |
| Studio Audio Effects (EQ, Reverb, Delay) | Locked | Full Access |
| MIDI Patterns (Arp, Chord Triggers) | Locked | Full Access |
| Import / Export (Setlists & Patches) | Locked | Full Access |
Transferring License to a New Device
Each License Key activates 1 device at a time (Windows, Android, or any future platform once supported by Onstage). If you switch phones or laptops:
- Open Onstage on your current device.
- Open About Onstage (from the Start Page).
- Tap the 'Licensed to <your email>' button to unlink your device.
- Enter your license key in Onstage on your new device to instantly activate it.